Showing posts with label Recipe. Show all posts

Thursday, November 4, 2021

HIGH TEA AT HOME

Had a piece of brownie at home. Had a block of viennetta ice cream (Chocolate flavor) at home. I took both together and what a nice combination! A nice brownie ice cream. Tasted superb! (Reminded me of mudpie!)

I paired it off with a cup of hot Lavender Earl Grey tea. The chocolate somehow brought out the aroma of the Earl Grey while there was still the lingering fragrance of the Lavender. It was such a great match.

What a nice high tea time within the comfort of my home!


Friday, April 24, 2020

Fried Rice

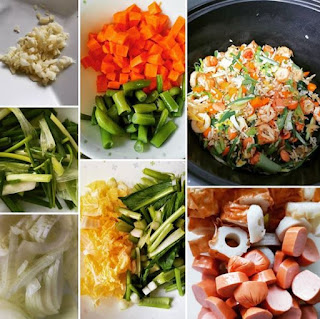
Due to circuit breaker, had to cook more often as compared to previously. Had so much leftover rice and after searching the fridge, managed to get enough ingredients for fried rice. 


Ingredients
2 pieces of garlic, peeled and diced
1 stalk green spring onion, cut into 1/2 inch long
1 white onion, chopped/sliced
1 carrot, diced
1 bunch of long beans, cut into 1/2 inch long
1/2 pack mini size hot dog, sliced into 1/2 cm thickness
2 piece of chikuwa, sliced into 1/2 cm thickness
1 cup of leftover rice (straight from fridge, do not need to thaw)
1 tablespoon oil

Methods
1. Heat up the cooking pan/wok with a tablespoon of oil.
2. Add in garlic till light brown 
3. Add in hot dog, carrot, white onion, chikuwa, long bean and green onion, item by item and stir fry for another 5 mins
4. Add in leftover rice and stir fry till well cook.

Note
1. Can add in a beaten egg after method step 4. Have to be fast to stir fry the rice with the egg so that each rice grain can be coated with the egg
2. Add in any desired vegetables or meat at step 3. The first ingredient to be add in at step 3 has to be the one that takes a longer time to cook (raw meat, followed by veg and then cooked item)

Monday, June 11, 2018

Recipe: Cream Cheese Frosting

Needed cream cheese frosting for a birthday cake. Read that frosting should be make earlier so I searched for a cream cheese recipe (link)


I doubled my recipe as I was afraid it is not enough for my cake.
So here is goes:

Ingredients
2 packs of 250g (approx 18 oz) cream cheese (Philadelphia cream cheese)
1 cup (approx 125g or 4.4 oz) of icing sugar
8 tablespoons of butter (melted butter for easier mixing)
1 teaspoon vanilla essence
Steps as below:
1. Combine all into a big mixing bowl 
2. Mix well until creamy
3. Use and required or refrigerate till you need to use

Step 1


Step 2

Tuesday, May 8, 2018

Recipe: Sandwich

Yes, it’s not difficult to make yourself a nice sandwich!


Make-do with whatever that is available in your kitchen and create your own “sandwich”.

Luckily for me, I have the below in my fridge

Ingredients

1. Bread/lettuce/rice wrap – for the top and bottom layer
2. Cheese
3. Ham in slices
4. Tomato
5. Butter

Making - Here you go:

a. If you have bread, then spread a layer or butter onto one side it bread

b. Stack one piece of the bread (the side with butter facing on top) on the plate.

c. Stack up ingredients (2 to 4) in the sequence you like.

d. Ends with placing the remaining bread on at the top (the side with butter facing down)

Note: At times, I will replace:

i. ham with bacon (if you have time to fry it to crisps or if you have bacon bits)

ii. cheese with egg (fried/sliced hard boiled egg)

iii. butter with margarine or strawberry/blueberry jam

bak kwa sandwich

Tuesday, February 6, 2018

Almond Florentine Recipe - Revisited (with Air Fryer)

CNY again, time for some baking... with my new electrical appliance in my kitchen... AIR FRYER!

My microwave oven has been quite cranky (the plate doesn't rotate 90% of the time) so I tried using air fryer and it worked just fine!

Air Fryer Setting
- temperature @ 160C
- timer set to 12 minutes

This time round, I changed the recipe to

Batch 1:
Ingredients
a. 70g almond
b. 20g pumpkin seeds
c. 10g sunflower seeds
d. 50g-70g florentine powder

Batch 2:
Ingredients
a. 70g butter almond
b. 20g pumpkin seeds
c. 10g sunflower seeds
d. 100g florentine powder

Instruction:
1. In a large bowl, simply mixed almond, pumpkin seeds and sunflower seeds (ingredient a-c) and stir in florentine powder a tablespoon at a time for easier mixing.
2. Spread onto the air fryer baking tray. (Note: to line the baking tray with baking paper)
3. Set air fryer temperature to 160C and timer set to 12 minutes
4. Keep tabs on the almond florentine, once turn brown, it's time to remove from air fryer.
5. Upon removed from air fryer, cut into desire shapes before it hardens.
6. Cool to room temperature and store as required.
- Sunflower seeds is a good combination

Results:

For Batch 1:

- Gaps in between
Saw online from other bakers they used a 2:1 (nuts:florentine powder), so for my recipe, the baked almond florentine has some gaps in between.

For Batch 2:
- Sweetness varies
The almond florentine looks good but my tester has commented it being a bit too sweet. I find this just nice.
- The butter almond further enhance the overall taste

Sunday, January 22, 2017

Almond Sugee Cookie


Ingredients
(yields approx 160 circle, love, star and flower shaped cookies (0.5 - 0.7cm thickness * 2 - 4 cm diameter)

400g Ghee (clarified butter)
700g all-purpose/plain flour
pinch of salt (1/2 tsp salt)
1 tsp baking powder
280g icing sugar
1 tsp vanilla essence
100g blanched almond (super fine powder)

Methods
1. In a bowl, sift all-purpose/plain flour
2. Add in salt and baking powder and stir to mix well and left aside till step 5
3. In another mixing bowl, cream Ghee with icing sugar till pale yellow (should look lighter than original butter yellow) and smooth texture (no lumpy sugar
4. Add in vanilla essence and mix well
5. Add in sifted flour portion by portion, till well mixed
6. Add in blanched almond and mixed thoroughly and formed a dough
7. On a plastic/cling wrap, shaped the dough to a long cylinder shape and wrap it.
8. Refrigerate the dough for 30 mins
9. After 30 mins, preheat oven @ 180 Celsius
10. Remove dough from fridge and cut the dough evenly and shape to the desired shape.
11. On a baking tray, place the shaped dough around 0.5~1 cm apart
12. Bake @ 180 Celsius for 15~20 minutes till shaped dough is completely cooked and is slightly brown.

Note:
-> At Step 5, the dough can be left as a whole ball shape and cover with a plastic wrap or cloth and refrigerate.
-> At Step 8, can opt to roll out the dough and use a cookie/shape cutter to cut the required shape. But the thickness is advised to be at least 0.5cm thickness but not more than 1 cm thickness. If it's too thin, the baked piece will be less melty, while a thicker version will required a longer baking time.
-> If to roll out the dough, can use the plastic/cling wrap to cover the dough and roll with the roller. This will prevent the dough from sticking to the roller and also remove the need for flouring the roller/dough.
-> Icing sugar can be reduce slightly by 30g to the recipe above for a less sweet version.
-> If you prefer better melting texture and/of almond fragrance, have an additional 50g blanched almond to the recipe above.

Monday, January 16, 2017

Pineapple Tarts Revisited


After a few years of not making pineapple tarts, this year I tried again. This time round, I added something to my original recipe here to make the pastry softer, Ghee. 

I made almond sugee cookie days ago and felt in love with the soft melting pastry. After browsing through the website on several other pineapple tarts recipe that used ghee, it seemed that just having an additional 2 tablespoons of Ghee with an increased amount of flour will make the pastry softer.

So this is it, my revised recipe with Ghee:

Ingredients 
(yields approx 65~70 pineapple tarts balls - 2cm diameter)

Pineapple Tarts
250g unsalted butter
470g plain flour
1 tsp baking powder (Optional, in my case, I did not have it so I did not add any in)
1/2 tsp salt
50g icing sugar (Can be lesser than 50, around 48g/49g)
2 eggs (separate egg yolk with egg white into two different bowls)
1/2 tsp vanilla essence
500g (1/2 pack of a 1 kg) pineapple preserve filling paste (bought the redman premium grade from phoon huat)

Glazing
1 egg yolk
1/2 tsp vanilla essence
1/2 tsp condensed milk
1/2 ~ 1 tsp vegetable oil

Methods
1. Sift all dry ingredients (flour, baking powder, salt and icing sugar into a big bowl)

2. Add butter and ghee with the dry ingredient and rub in till breadcrumb-like.
Note: Cut the butter using a platter knife into cubes and stir with the dry ingredients until it becomes easier to rub in the flour with butter with your fingertips.

3. Add in the eggs yolks (with the vanilla essence) and knead to become a dough.

4. Leave in fridge for 20mins (or less than 40 mins else the dough will harden and you will not be able to roll out the dough immediately)

5. Take 1/2 pack of the 1 kg pineapple preserve filling paste (which I believe is still more than enough) and make them into small balls shaped(size depends on your need, the bigger the ball, the more dough will be used to make 1 pineapple tarts. That would also mean a lesser quantity produced.)

6. After removing the dough from fridge, roll out dough on a rolling board and fold the dough for a few times.

7. From the dough, take a small portion and roll into a ball shape around 2 cm diameter. Then press it down for a flatten round shaped dough and place the pineapple ball in the center.

8.Wrap the pineapple with the round shaped dough until it has covered the entire pineapple, remove some of the dough if it looks too thick.

9. Preheat oven at 180 Celsius.

10. Mixed all the ingredients listed under "Glazing" and glaze ONLY the top of ball shaped pineapple tarts.

11. Bake for 20 mins @180 Celsius

Notes:
-> I preheated my oven ONLY when I am done at step 8. For I used microwave oven, the preheat stage required a minimal time. The norm is to preheat the oven at the start (as a step 1) before anything begin. 
-> For those who don't like a softer pastry, do try the recipe from here.

Wednesday, December 14, 2016

Braised Chicken with Carrot, Potato and Onions

Braised Chicken with Carrot, Potato and Onions

Ingredients
a. 8 ~10 pcs small chicken drumlets

b. 2 tsps light soy sauce
c. 1 tsp seasame oil
d. 1 level tblsp sugar
e. a dash of black pepper
f. 3 potatoes
g. 1 carrot
h. 1 yellow onion
i. 1 leek
j. 2 cloves of garlic


Preparation Part 1: Marinate chicken

Step 1: Place chicken in a bowl.
Step 2: Combine the ingredient from label b. to e. with the chicken and mixed well.
Step 3: Using cling wrap, cover the bowl and refrigerate for at least an hour or over night (for better taste)

Preparation Part 2: Prepare the remaining ingredients


Step 4: Remove skin on the onion, potatoes and carrots and cut into desired shape. Rinse to remove any dirt.
Step 5: Rinse leek and sliced finely.
Step 6: Remove the skin on the garlic and chopped finely.


Cooking time


Step 7: Heat 1~2 tblsp oil in a pot
Step 8: Add in marinated chicken and stir fry till golden brown and remove from pot
Step 9: Using the same pot with medium heat, add in the another tblsp of oil and fry the garlic till golden brown.
Step 10: Add in potato and stir fry till cooked.
Step 11: Add in carrot and stir fry till cooked.
Step 12: Add in chicken, onion and leek and fill with water enough to cover at least 1/2 to 3/4 of the dish.
Step 13: When water started to boil, cover the pot with lid and reduce heat to low heat and simmer for 30 minutes

Sidenote:
1. Leek is optional. Happened to have it in my fridge so I just added it in.
2. If using big size drumstick, might want to check if it is well-cooked during step 8. Alternatively, maybe can increase the simmer duration to 40 minutes in step 13 so that the meat will be tender and the inside is cooked completely.


Thursday, October 6, 2016

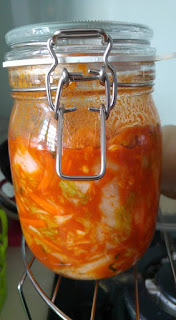
Kimchi


Kimchi

Ingredients
1/2 cup Sea Salt
4 tablespoons Hot Red Pepper Paste
1 tsp grated Young Ginger
1 Napa Cabbage 
1 Scallion - Wash, dried and cut into 1 1/2 inch long
1 Carrot Wash, dried and cut into 1 1/2 inch long
8 cloves of garlic, cut in half
1 big bowl
Airtight (preferably glass) container

Steps
1. Wash cabbage
2. Cut cabbage into small pieces
3. In a large bowl, rub salt to each cabbage piece.
4. Fill up the bowl with water enough to over the cabbage and let it submerge for an hour. (This is to soften the cabbage. Submerge in water longer till cabbage is soften.)
5. In another large bowl, prepare the paste by adding in the Hot Red Pepper Paste, grated young ginger, scallion, carrot, garlic and mix well. 
6. Back to the cabbage after it has soften. Drain the salt water from the cabbage and rinse with water (3 times min) and squeeze out the water in the cabbage.
7. Slowly add in portion by portion of cabbage into the mixed paste and mix well.
8. After all the cabbage has been combined and well mixed, packed it into container. Ensure the water level cover the top of the kimchi. If water from kimchi is not enough, top up with water.
9. Leave it at room temperature for 1 day and use a spoon to press the kimchi downwards to compress and remove the air bubbles.
10. Refrigerate kimchi and serve when required.


Fridge the kimchi and serve as required

Note: 
> There are various recipes on the web. This is my own version as I didn't have the complete ingredients. For example, daikon/radish, self-made paste for the kimchi and spring water are used/recommended in other recipes. 
> The time to leave the kimchi varies with the room temperature.
> Sterilize glass bottles before canning.


Tuesday, October 4, 2016

Baked Blooming Onion


Baked Blooming Onion
Recipe
1 onion
3 eggs
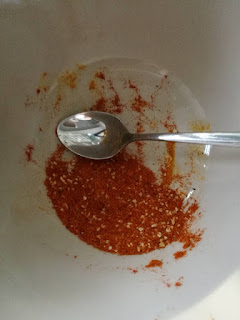
1 tablespoon Paprika
1 tablespoon Turmeric
1 tablespoon Garlic Flakes
1 teaspoon Black Pepper
Pinch of Salt

Steps
1. In a bowl, beat the 3 eggs.
2. In another bowl, mix well the all the spices and salt 

3. From the top, cut 1/4 of the onion. Do not remove the root (yet)
4. Turned the onion 180 degree, where the cut portion laid flat at the chopping board.
5. Around 0.5~1cm away from root, cut straight downwards into the onions into 4 sections
6. In between the each section, further cut straight downwards into the onion to divide each section into 4 portion. Will arrive at 16 sections in total.
7. Slice off the root, be careful not to slick too much or the sections will fall apart.
8. Turn the onion 180 degree, where the root section now laid flat at the chopping board.
9. Gently open the petals so they spread out. Remove any petals or the middle portion IF it is detached from the onion.

10. Preheat oven at between either 180~200 degree celsius.
11. Prepare a baking tray with a baking sheet and lightly greased the baking sheet.

12. Bring the blooming onion to the bowl with the spices and sprinkle each petal with the spices.
13. Bring the blooming onion to the bowl with egg mixture and coat each petal with the spices.
14. Once again, bring the blooming onion back to the bowl with the spices and sprinkle each petal with the spices.

15. Lay  the blooming onion onto the baking sheet and cover the top with an aluminum sheet
16. Bake for 30 mins @ 180~200 degree celsius (I tried mine at 200 degree celsius)
17. Remove the aluminum sheet and bake another 10~15 mins @ 180 degree celsius. (I baked for 15 mins)


The onion

The mixed spices and salt

Beaten Eggs


 The cut onion


Note: 
> For the spice, have to top up more in volume if it's not sufficient enough for sprinkle on the all the petals. 
> In other recipe, there is variation in the spices used. I only have the above listed. Can explore around and try add in other spices.

Source: Got the recipe instructions from http://paleogrubs.com/baked-blooming-onion

Friday, March 18, 2016

Easy Cold Tofu (kewpie sesame sauce and bonkita flakes)


Easy Cold Tofu


Ingredients (Serving for 1)
150g (1/2 of a 300g) silken tofu
20g of bonkita flakes
Kewpie Sesame Sauce

1. Open the packet of silken tofu and slice in the middle. 
2. Remove half of it and drain the water
3. Place on serving plate
4. Place bonkita flakes on top of tofu
 5. Pour desired amount of Kewpie Sesame Sauce on top.


Bonkita flakes

Kewpie Sesame Sauce 


Note:
> Tofu tasted better if served cold
> For better visual, reverse sequence 4 with 5 but the bonkita flakes will fly off the plate.
> Kewpie is the brand. Can go for other brand's Sesame Sauce.
> Add spring onions for better visual 


Wednesday, March 2, 2016

Easy Ice Cream

Following the recipe from here

Ingredients
2 cups Whole Cream or Heavy Whipping cream (16 fl oz)
1 can Sweetened Condensed Milk (about 14 oz)

Steps
1. Blend everything together for around 4 minutes till mixture is thick and creamy.
2. Place in freezer container and refrigerate as desire.

Optional
For flavors, add in your desired toppings before step 2 and mixed well.

For Biscuits Flavors
Oreo Flavor
1. Crush the desired amount (maybe 8 Oreo for every 1/3 portion of the mixture. DON'T make it too finely crush, try to have it as big chunks of it).
2. Scoop the required mixture amount and fold in the crushed Oreo.

For Coffee/Tea Flavors
Tea Leaves/Coffee Powder
1. The amount of tea leaves (maybe 2 tablespoons/6 tea bags of tea leaves for every 1/3 portion of the mixture) or a pack of instant coffee powder for every 1/3 portion of the mixture
2. Scoop the required mixture amount and place on a pot.
3. Warm the pot over low heat and when pot is slightly heated, add in the tea leaves or coffee
powder.
4. Infuse the tea leaves or coffee powder till the taste is to your liking and remove from heat.
5. Remove any solid residue in mixture.
6a. (Optional) Leave to cool for around 15-30 mins (till steam is not visible from mixture)
6b. Refrigerate mixture in freezer.

For Fruity Flavors
Fruity Flavor
1. Use a tablespoon of the artificial flavor essence and cut the desired amount of fruit bits into cubes.
2. Scoop the required mixture amount and fold in both the fruit bits and the essence.

.
.
.

Outcome
I tried making the Oreo and Tea flavors.

-> For the Oreo flavor, the ice cream was hard. Hard to remove from freezer for a while before I can scoop it out. However, the Oreo I used was too fine/too little. Would recommend to mix in more quantity and have bigger chunks. Gently stirred the Oreo into the mixture

->For the Tea flavor, the ice cream was just right. Easy to scoop but the taste of the milk overpowered the tea. If preferred a stronger tea flavor, maybe had to increase on the quantity of tea leaves but not increasing the amount of water. Would recommend to mix in more quantity and have bigger chunks. Gently stirred the Oreo into the mixture

Wednesday, February 17, 2016

Earl Grey Tea Cookie Recipe

Got the ingredients from the web and I can't remember the source. If you are the owner to the recipe and wish to be credited for this, please highlight to me with your link and I will do so.

Ingredients
a. 256g all purpose flour
b. 4 tablespoons finely grounded Earl Grey tea leaves (approx 8 teabags)
c. 1/2 teaspoon salt
d. 227g unsalted butter
e. 100 g confectioner sugar
f. 1 tablespoon finely grated orange zest

Steps

1. Combine tea leaves, salt and flour in a bowl and mix well


2. In another large mixing bowl, cream butter and sugar till white and fluffy. (About 3 minutes using medium beating speed)


3. Add flour mixture into the creamed mixture till well blend (using low speed) or till it formed a dough. (Mine didn't formed a perfect dough, it was towards a sticky mixture)


4. Scoop mixture cling wrap or baking paper. (Despite not forming the dough, I proceed with this step. Highly recommended to use baking paper instead as small chunk of the mixture might get stuck on the cling wrap if not properly laid)


5. Roll into a log (approx 2 1/2 inch in diameter) and twist the end of wrap.


6. Refrigerate for 30 minutes.
7. Preheat oven to 180°C
8. Remove dough from cling wrap and cut into 0.4cm thick circle pieces.
9. Place on baking tray approx. 2 inch apart and bake for 12 minutes or edges are just brown.
10. Cool for 5 minutes and transfer to wire rack and cool to room temperature.

My Earl Grey Cookies


Side Notes
-> Follow step 10 as cookie will break/crumble easily if remove immediately from baking tray.
-> Tea leaves should be finely grounded or it might have a bitter after-taste.
-> If the cookies spread out/flatten during baking, lightly flour the baking tray and/or chill the cut dough before baking.


Tuesday, February 16, 2016

Taiwanese Crepe Dan Bing 蛋餅

After my trip from Taiwan, I have been craving for this which I had at Taipei every morning when we had to hunt for breakfast. So I made my own...

Ingredients:
a. 100g flour
b. 1/2 tblsp cornflour
c. 1/2 tsp salt
d. 150ml water
e. 2 eggs
f. 1 stalk spring onion (washed and chopped)
Optional Sauce
g. Japanese sweet sauce/Mayo/Chili sauce

1. Sift flour, cornflour and salt in a mixing bowl
2. Add in water into the flour mixture and mixed well till no lumps can be found in the batter (Use whisk for fast combining)
3. In another bowl, beat eggs with chopped spring onion
4. In a non-stick flat pan, heat up lightly oil pan using low heat (oil is required for the crepe crispness).
5. Pour a scoop of the batter into the centre and quickly use the bottom of the scoop to spread out the batter in a circle motion till thin thickness.
6. On the top of the batter, pour a scoop of eggs mixture and spread the eggs mixture to cover the batter.
7. When eggs are almost cooked/when the crepe looked translucent, fold the crepe while allowing the crepe to continue cooking
8. Slice the crepe and served with the optional sauce.


Side Notes
-> After step 6, if you prefer the eggs to be more throughout cooked, then Step 6b. flipped the crepe on pan for around 10-20 seconds and follow step 7.

-> Can also add in more ingredients such as ham, bacon, hotdog, cheese etc. Either add in the ingredient in the egg mixture and proceed with the above Step 6b. However, extend the cooking time to make sure the ingredients used are cooked thoroughly. 

Monday, February 15, 2016

Almond Florentine Recipe (using Florentine Powder)

Makes around 36 pieces of square blocks (1 inch * 1 inch) with the below ingredients

Ingredients
a. 80g almond
b. 20g pumpkin seeds
c. 10g cranberries
d. 50g-70g florentine powder

Method
1. Mixed almond, pumpkin seeds and cranberries (ingredient a-c) in a bowl and stir in florentine powder a tablespoon at a time for easier mixing.


2. Preheat oven at 180C

3. Line baking tray with baking paper and spread the mixture evenly till baking tray is filled up evenly.


4. Bake at 180C till brown approx 8-10 minutes. (If it has a burnt smell before 10 minutes is up, quickly stop the baking and adjust the baking time)


5. When baking is completed, remove the baked almond florentine from baking tray and on a even surface (I used my cooking board), quickly cut the florentine into required shapes. (I cut them into squares)

Side Notes:
-> Previously I made this with the butter and sugar recipe which involved more steps. It  significantly less costly but it tedious trying to separate the almond so it would laid thinly on the baking sheets. The outcome wasn't as good as using Florentine powder too. There were part where it was too dark or burnt while some were too soft because of inconsistent thickness. Using the Florentine powder, it was almost only 5% failure from the baking and it was not because it was burnt, but because too thick and required a longer baking time.

-> Almond is highly recommended as the base ingredient. For pumpkin seeds and cranberries, apart from the texture difference, the color itself is the reason I choose them. If you are not a fan of these two ingredients, you can explore other options such as walnut, preserved cherries, pistachio, raisins etc.

-> I got the florentine powder from Phoon Huat which is a packet @ 500g around $12 (is $11.xx but can't remember actual pricing.)

-> The florentine powder will become sticky and lumped together if exposed to air after some time. Don't leave the mixture lying around for long or you can't tell if it's been mixed with the powder already

-> If you have broken pieces of the baked almond florentine, don't throw away! Consolidate them up in a bottle and bake them into a ball size style. It still look lovely for gifting and taste great too.

Almond Florentine Ball (in Baking Cases)

Steps
1. Mixed the consolidated florentine with a table spoon of florentine power.


2. Prepare mini baking cases and lay them on the baking tray individually.

3. With the mixture from 1., scoop a teaspoonful of the mixture into the mini baking cases.


4. Preheat oven at 180C
5. Bake at 180C for around 5- 6 minutes or till the powder has turned brown. If it has a burnt      
          smell before 10 minutes is up, quickly stop the baking and adjust the baking time


Tuesday, February 2, 2016

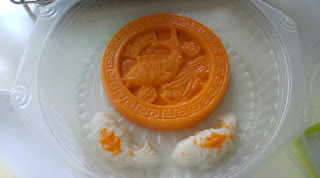
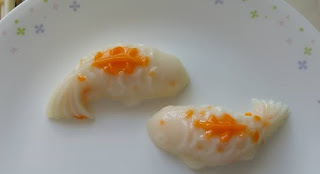
Koi Fish Nian Gao Recipe 鯉鱼年糕 (年年有鱼/余)

Wanted to make the Fish Nian Gao for Chinese New Year and googled to find the recipe from this blog.


First thing I need.. is the mould! I tried to find the fish mould at Phoon Huat but can't find.  (Updated as of 5th Feb 2016: Saw Phoon Huat had a big fish mould. Think it was sold out previously)

Googled (again) and found it at Kitchen Caper at Kallang Bahru (Singapore). Finally got it @ 3 for $5.00.

Mould for small fish


Mould for big fish

Ingredients:


a. 200g glutinuous rice flour
b. 100g ungluten wheat flour ( tang mien  flour)
c. 25g rice flour
d. 160g-180g sugar (I used 170g)
e. 400ml coconut milk (used 2 small packet (200ml) easier, don't need to measure)
f. 150ml water
g. 1tbsp corn oil
h. 1 tsp orange coloring
i. Small quantity (around 10 pieces) of raisins/wolfberries/cooked red beans OR coloring

Method:
1..Sieve all the flour (ingredients a - c) together.

2.  Stir in coconut milk and mix well.
3.Boil water with sugar and mix well till the sugar dissolve and leave to cool.

4.Stir sugar syrup and oil into flour mixture and mixed well. (I used a whisk for faster and easier mixing the mixture)

5.Remove a quarter of the mixture and used the smaller portion and add in the desired coloring.

6.Greased the fish mould (Remove excess oil in the fish mould with paper towel)

7. Drip a few drops where you want the orange color to appear and steam for 3-5 minutes.

8. Half-fill the fish mould with plain batter. Drip in a few drops of the orange color and fill up with plain batter.

9. Steam for 20-30mins on high heat.

10. After remove from heat, let the nian gao cool to room temperature.

11. Remove from mould, start with removing the tail till head to prevent the tail from crack. As you have greased the mould, it will be easy to remove from mould.


12. Fish Eyes -
Either:
a. Insert the raisin/wolfberry/cooked red bean for the (big size) fish eyes
OR
b. Color it with coloring. I tried coloring for my fish nian gao eyes with the use of a toothpick.

However, the coloring smudged after a few days' time. 

Suggestion: Stick to method a. - insert one of the mentioned ingredient for the fish eyes.

Sides Notes: 
The mould: The mould is suitable for making jelly and steaming. However, the shop lady mentioned that the material of the mould is not advisable for long hours of steaming. Recommended is less than 20 minutes but I tried 30 minutes and the mould still looked fine.

Steamer: I used the tefal streamer. Turn the dial to the required timing and let it steam.

Refrigerate..or not?: If refrigerated, the nian gao would be harden (and more firm). However, it cracked (for my nian gao) after I removed it from the fridge... It cracked after a few days' time, not instantly noticeable.

Quantity made: I was able to make 4 big fishes, 6 small fishes with some remaining batter that is enough for 2 small ingots.

Color Options: For the fish nian gao, from pure orange, to semi-orange and white, to semi-red with white, or red-orange-black with white, you can play around with color varieties. For a classy feel, dust/brush it with some gold color.

Packing: ROUND container with CLEAR cover highly recommended if you have 2 fishes of the same shape. If can't find a clear cover, look for container with removable lid. If no lid, use shrink wrap instead to prevent dust or pest. Can also consider a gold color round board. Decorations piece such a gold coin or ingots or greeting words goes well too.


"Huat" time: It took around 3 days after I removed it from fridge to room temperature for the fish nian gao to "huat" (as in the black spots (mold)).